Camera aperture and aperture numbers
Camera lens aperture is a mechanical device in a lens that can be used to control the size of the opening in the lens (aperture). The aperture is reduced or enlarged by sliding the blades of the aperture blades. The term “aperture” refers to the opening in the lens and therefore the amount of light that can penetrate through this partial closure of the aperture. In the picture you can see the nearly closed aperture in a camera lens. The lamellae are beautifully visible here.

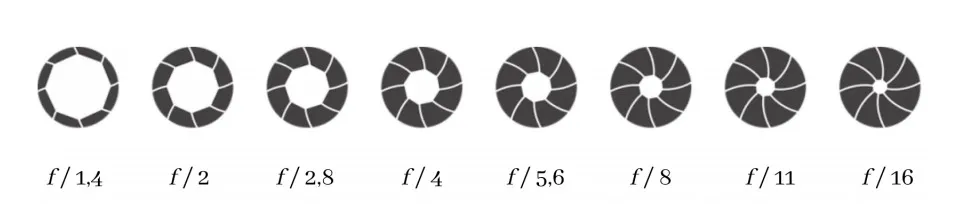
The opening size of the aperture blades is given in aperture numbers usually in numerical series 1; 1.4; 2; 2.8; 4; 5.6; 8; 11; 16; 22… Their setting controls the opening of the camera’s aperture blades. The smaller the aperture number you set, the more the camera aperture opens.
The smallest aperture number that can be set on your lens is determined by the design of the lens. Its numerical value is usually indicated by f/, sometimes also 1: on the body or front ring of your lens.
The size of the aperture number affects the aperture opening in the photograph:
- Depth of field – the sharply rendered part of the photo around the point you focused on. As a rule of thumb, the smaller the aperture number, the smaller the depth of field of the photo. So, with a low aperture number set, you will take a photo with a shallow depth of field, and conversely, a high aperture number will cause a large depth of field in the photo.
- Exposure – the brightness of the photo, the rule of thumb is the lower the aperture number you set, the brighter the photo you get.
The strangeness of aperture values
Aperture numbers are listed in a numerical series typically 1; 1.4; 2; 2.8; 4; 5.6; 8; 11; 16; 22… You must be wondering why the adjacent aperture values are in such strange multiples. Even if it doesn’t seem like it at first glance, it’s because the camera’s designers wanted to make life easier for photographers and ensure maximum simplicity when setting aperture, exposure time and ISO values.
It’s easy to imagine that if you change the ISO value from 100 to 200, you’ve doubled the ISO value. It’s the same with exposure time. For example, if you change the exposure time from 1/30 second to 1/60 second, you’ve cut the exposure time in half. How and why look for a doubling between aperture values such as 1.4 and 2?
Aperture number, exposure time, and ISO sensitivity combine to create the exposure of a photograph. The relationship is that if you halve the exposure time (from 1/60 to 1/30) and double the ISO from 100 to 200, you will get an equally exposed photo. Changing the ISO value to or exposure time to an adjacent value is called a 1EV change (from Exposure Value).
The aperture number tells you what aperture diameter you have set, i.e. how much light will pass through the aperture opening of the camera sensor. To let twice as much light through, you just need to increase the aperture diameter to twice that. In the table below, the aperture values are converted to area. Some inaccuracy in the doubling is due to rounding the aperture numbers to one decimal place and the result to whole numbers.
| Aperture number | f/1.4 | f/2 | f/2,8 | f/4 | f/5,6 | f/8 | f/11 | f/16 |
| Conversion to area | 6 | 13 | 25 | 50 | 98 | 201 | 380 | 804 |
So these strange aperture number values provide a balanced relationship between the exposure parameters – aperture number, exposure time and ISO. If you set either of these parameters to an adjacent value, then all you need to do to ensure the same exposure is to move one of the other two exposure parameters to the side with the opposite sign. You’ll use this knowledge of how aperture numbers work when shooting in non-automatic mode.